Lightning and 3DEXPERIENCE
The only feature of the 3DEXPERIENCE platform our customers seem to like is its PDM functionality. It lets you manage files, versions and releases without the need for a company server.
But SOLIDWORKS still runs locally, and will probably never be cloud-native. So your files need to be local as well.
That’s why you can use Lightning with 3DEXPERIENCE, with very little effort.
1. Upload your files
Whether you use your own fastener files or you use our Fastener Models Library, you first need to upload all your files to 3DEXPERIENCE.
If you bought our fasteners, please also upload the included XML files to automate the Lightning setup.
2. Add your files to the Design Library in SOLIDWORKS
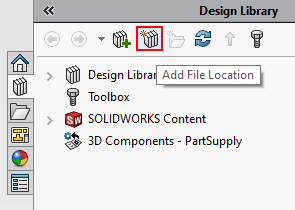
After uploading your fasteners to the platform, you need to add a link to the files in SOLIDWORKS and keep that whole folder in sync.
To do this, click the Design Library tab, then click Add File Location. You can now select a folder/project on 3DEXPERIENCE with a button in the bottom left.

Once you do this, all your fastener files will be copied to your local drive and the folder will be kept in sync with the cloud. We now have everything in place to set up Lightning, assuming you already installed Lightning.
3. Identical paths for everyone
Lightning stores the path to your files in its database. We can store absolute/complete paths or we can combine a personal root folder with a shared subfolder structure.
Read more at Storing absolute or relative file paths.
4. The importance of filenames
Lightning works best when your filenames contain size data. But if you want to use unique numbers for filenames, you can also make that work with some extra effort.
When we create our fastener files for our library, we include all relevant size and material information in the filename. We extract this data from the filename during the Lightning setup process. You can read more about this at How to extract dimensions from filenames and configuration names.
But luckily, we also let you use configuration names and custom properties. And if all of that doesn’t work for you, you can still enter data manually. We explain it all in the link above.
5. Automate the Lightning settings with XML files
We told you to upload our XML files (when you bought our library) and to keep the filenames the same. This is all done so that we can automate the Lightning setup process for you, for about 99%.
When you add a folder with fasteners to Lightning, we look for an XML file in each subfolder and we use the contents of this file to extract data from filenames, configuration names or custom properties.
We explain everything in this article: Settings: each step explained.